
Workday Core Connectors provide a supported way to exchange data between Workday and external systems without building every integration from scratch. Workday supplies connector templates for common domains such as worker data, payroll, finance, and spend management.
A connector still requires sound design. Your team must define the source population, fields, change-detection rules, output format, delivery method, security, and operating ownership. This guide explains those decisions through a Core Connector: Worker example.
How Workday Core Connectors fit an integration strategy
Where a core connector helps
Faster setup: A supported template gives the project team a starting point for common data and delivery patterns.
Lower maintenance burden: Workday maintains the connector framework, while your team owns configuration, transformations, schedules, and downstream dependencies.
Controlled change detection: Transaction-log subscriptions let the integration send relevant worker changes instead of full files on every run.
Consistent data exchange: Defined field mappings, transformation rules, and delivery controls make outputs easier to test and support.
Workday Core Connectors are commonly used for HCM, payroll, financial, and spend-management exchanges. The right choice depends on the business event, target system, required fields, delivery frequency, and support model.
Choose the connector from the business requirement
Start with the receiving system's requirements. Confirm the population, data fields, effective-dating rules, file or message format, schedule, transport, and error-handling expectations before selecting a connector.
Check that the target vendor can accept the supported output and that your team can own the transformation and monitoring. Workday Core Connectors reduce custom development, but they do not replace requirements, security review, or production support.
Plan extensions before configuration
Use transformation services or APIs only for gaps the standard connector cannot address. Document each custom mapping or business rule, keep the XSLT or other transformation code under version control, and test changes in a non-production tenant. This keeps the integration understandable when Workday releases, vendor requirements, or internal processes change.
Integration value comes from reliable operations
A connector creates value when the receiving system gets complete, accurate data on schedule and the support team can diagnose failures. Define ownership, alerts, reconciliation, and recovery before go-live.
Workday Core Connectors can support payroll, talent, finance, and other exchanges, but the business outcome depends on how well the team governs the full data path. Workday describes Workday Integration Cloud as its framework for connecting Workday with third-party systems.
Core Connector: Worker
Among Workday Core Connectors, Core Connector: Worker handles outbound worker data for HR, payroll, benefits, identity, learning, and talent systems. Teams can select worker data sections, subscribe to relevant transactions, transform the output, and deliver files on a schedule.
What Core Connector: Worker exports
The connector can include employee details, positions, locations, organizations, status, compensation, personal data, and other selected worker information. It produces XML by default. A document transformation can convert that output to a vendor-specific CSV or another required format.
The transaction log identifies subscribed changes since the prior successful run. The integration team should define which business processes and transaction types matter. Subscribing to everything can capture future Workday changes, but it can also send fields or events the vendor neither expects nor needs.
Benefits and limits of Core Connector: Worker
Supported starting point: The connector supplies a standard worker-data framework, which reduces the amount of custom extraction logic.
Incremental delivery: Transaction-log change detection can limit each run to relevant worker updates.
Flexible output: Teams can select data sections and apply a documented transformation for the target vendor.
Operational responsibility: Your team still owns field mapping, data validation, security, schedules, alerts, retries, and downstream reconciliation. Treat the connector as one component of the integration, not the entire solution.
Example: Send worker demographic changes to an external vendor
Requirements
Assume an external vendor needs worker demographic updates from Workday. The file must include hires, terminations, termination reasons, and changes to home contact information. The team selects Core Connector: Worker because it can detect subscribed worker changes and produce a scheduled outbound file.
The tables below define the population, fields, format, delivery location, filename, and schedule. Confirm these requirements with the data owner, security team, and vendor before configuration.
Configuration steps
1. Create the Core Connector: Worker integration system
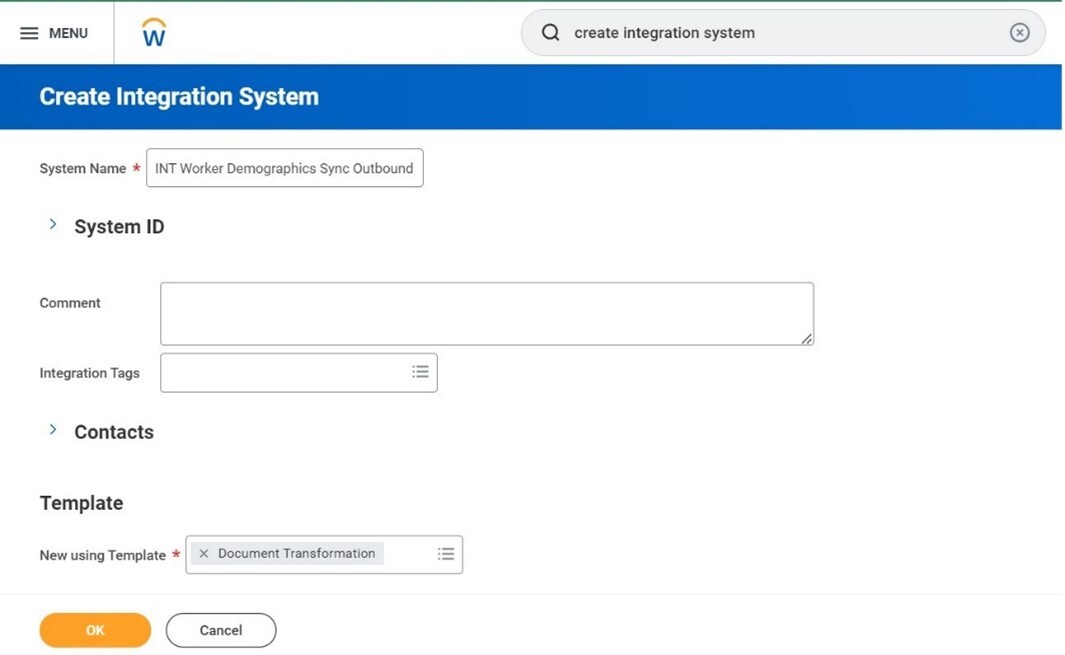
In Workday, search for the Create Integration System task. Enter a clear system name and select the Core Connector: Worker template. Use a naming convention that identifies the direction, data domain, and receiving system.
2. Enable the required integration services
Enable only the services needed for the approved field set. In this example, the integration uses initialization, personal, status, position, contract, compensation, transaction-log, and filename-sequence services.
3. Configure integration attributes
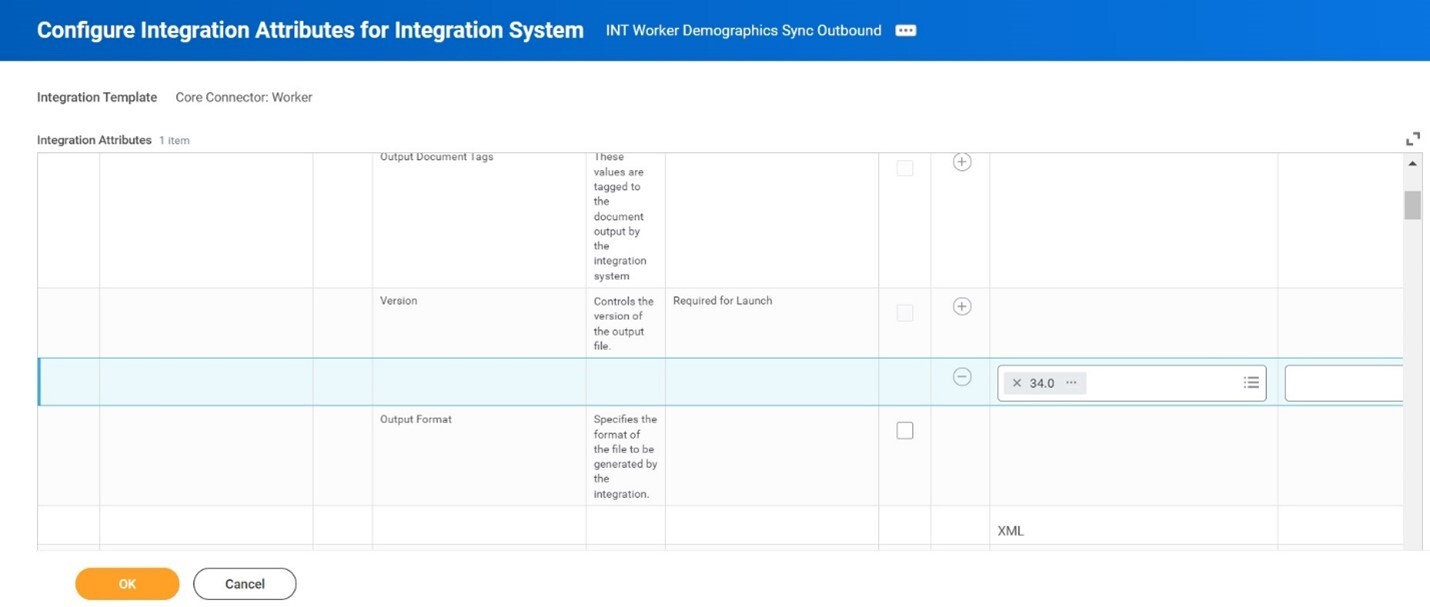
Workday will prompt you to complete the required attributes and maps. From Related Actions, open Integration System > Configure Integration Attributes. Record the purpose and owner of each value rather than relying on tenant knowledge.
4. Configure field attributes
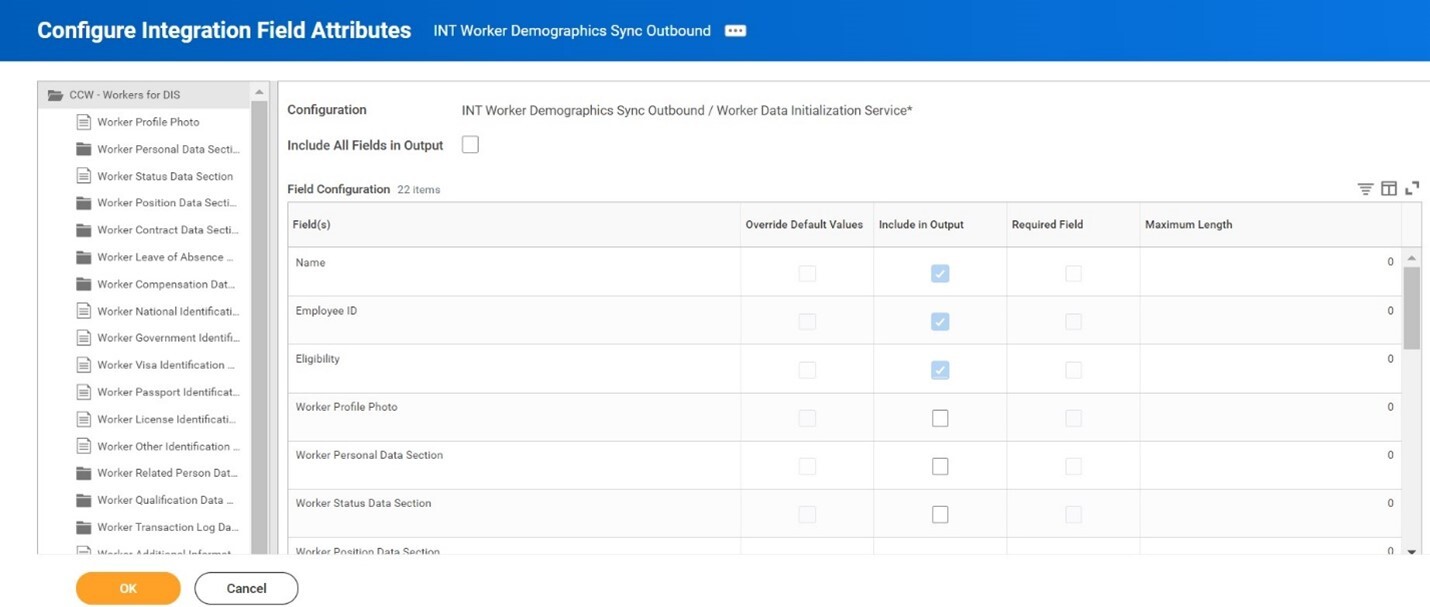
From Related Actions, open Integration System > Configure Integration Field Attributes. Map the approved Workday fields to the values required by the vendor. Verify optional fields, null handling, code conversions, and effective dates.
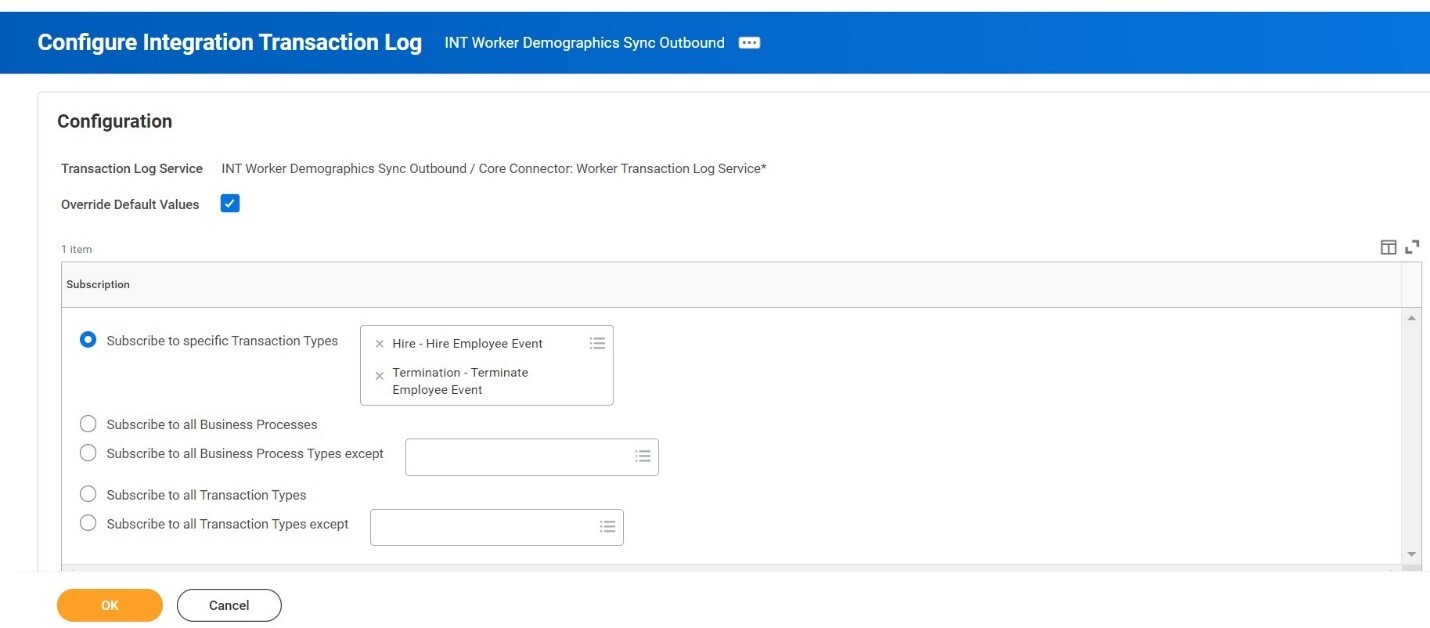
5. Configure transaction-log subscriptions
From Related Actions, open Integration System > Configure Transaction Log. Subscribe to the business processes and transaction types that should trigger an outbound update. Test hires, terminations, corrections, rescinds, and contact changes so the integration does not miss or duplicate events.
6. Define the output format
Core Connector: Worker produces XML. If the vendor requires CSV, add a document transformation and use an XSLT file to convert the output. Agree on delimiters, quoting, headers, date formats, decimals, encoding, and null values before development.
7. Create the document transformation
Create a second integration system with the Document Transformation template. Give it a name that ties it to the parent connector and target vendor.
From Related Actions, open Integration System > Configure Integration Attachment Service and upload the reviewed XSLT file.
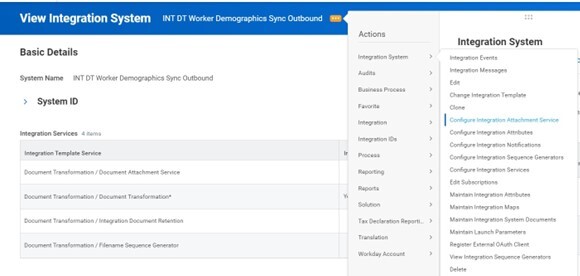
Prepare and validate the XSLT file outside production before uploading it. Store the source file in version control with an owner and change history.
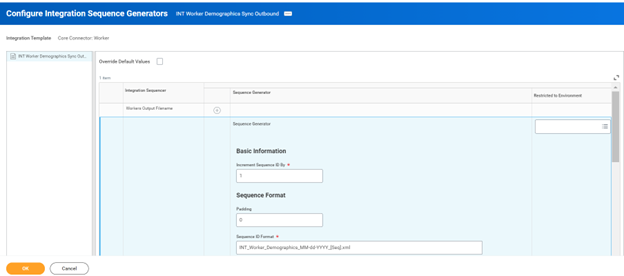
Use Configure Integration Sequence Generators if the vendor requires a chronological value in each filename.
8. Configure the integration business process
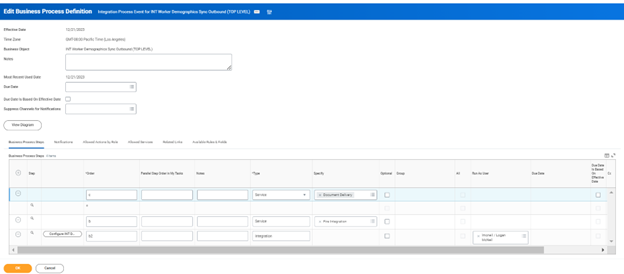
Add the transformation and document-delivery steps to the connector's integration business process.
- Open Related Actions > Business Process > Edit Definition.
- Add an integration step for the document transformation.
- Add a service step for document delivery.
- Configure the SFTP destination, credentials, directory, and filename.
Use a service account and a managed credential process. Do not store production passwords in project documents or screenshots.
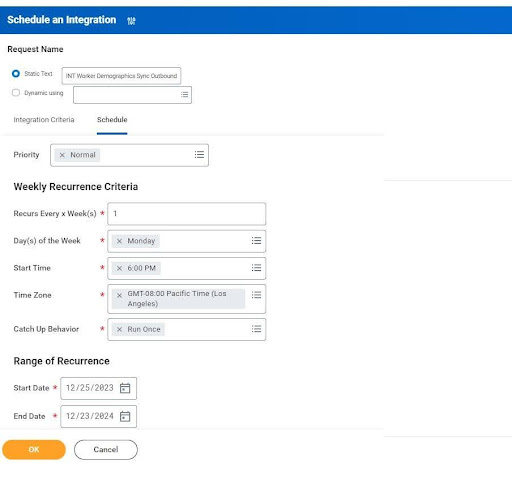
9. Schedule the connector
Schedule the run according to the approved business requirement. This example runs every Monday at 6:00 p.m. Confirm the time zone, holiday behavior, retry policy, and dependency on upstream business processes.
10. Prepare the receiving system
- Configure the vendor endpoint to receive the file.
- Confirm that the vendor can parse the agreed format.
- Map each incoming field to the correct target field.
- Define how the vendor reports rejected records and incomplete files.
Test and monitor the integration
- Run positive and negative tests with representative worker events.
- Compare source records, outbound files, and vendor results.
- Confirm encryption, access, retention, and credential handling.
- Test alerts, retries, duplicate prevention, and recovery.
- Reconcile record counts and critical fields after each production run.
- Review the integration after Workday releases or vendor changes.
Workday Core Connectors production checklist
Security: Protect worker data in transit and at rest. Limit access to the integration, files, credentials, and logs.
Data quality: Validate required fields, code mappings, effective dates, null values, and record counts.
Error handling: Assign owners for alerts, retries, rejected records, and vendor escalation.
Change control: Retest the integration after Workday releases, vendor changes, or mapping updates.
Documentation: Record requirements, configuration, transformations, schedules, dependencies, owners, and recovery steps.
A well-run Workday Core Connectors implementation gives the receiving system dependable data and gives support teams a clear path to investigate failures. EVOCS supports enterprise implementations and ongoing managed services when teams need help designing, testing, or operating these integrations.